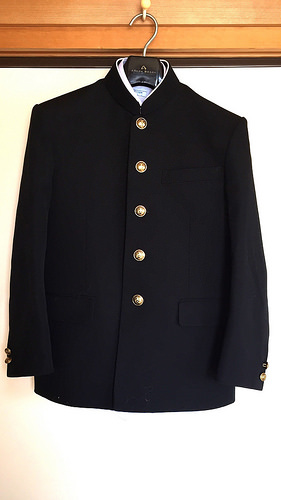
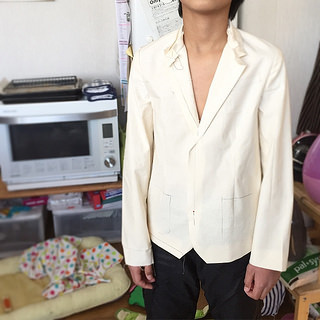
 Japanese junior high school uniform
Sidra is entering junior high school next month, and this is the uniform that he will be wearing for the next three years. No, I didn’t make this, but it is a very interesting uniform so I want to post about it.
I think every parent with a growing child understand how difficult it is to find a good fitting clothes for their child. A good fitting outfit is nice to look at, but sadly can only be worn for several months or maybe a year.
Then people usually buy or make clothes that several sizes too big to prolong the wearing life, which unfortunately don’t look too good on the child. That is why so many children are wearing either too big or too small clothes.
This set of uniform is not too cheap, so people want them to last for the three years of school life. Not many people want to buy a new set of new uniform each time the child grows up.
But uniform in several sizes too big won’t look too good, not to mention uncomfortable for daily school life. This is where the Japanese engineering comes in. The uniform is designed in such a way that they can be altered to several sizes up!
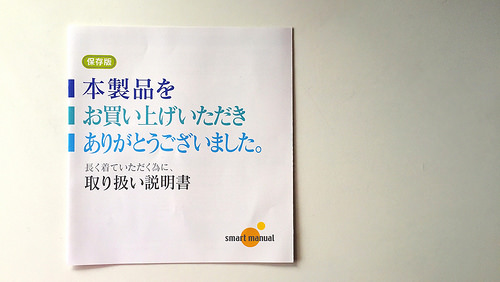 User’s manual
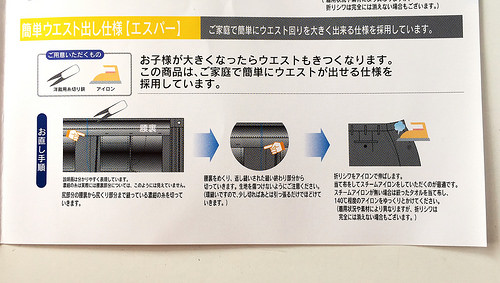
This is the user’s manual that comes with the uniform. It says something like, “Thank you for purchasing this product. This is the manual to ensure long time wearing.”
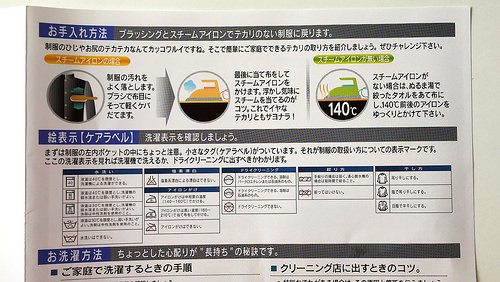 How to care
First, the usual care information.
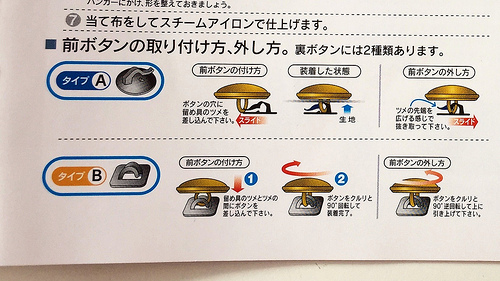 Button types
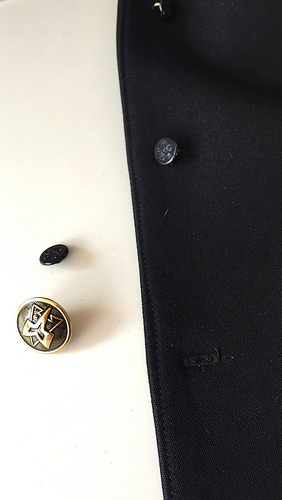
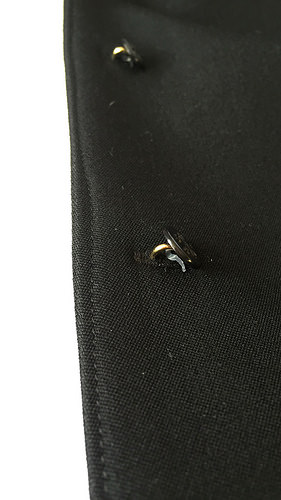
The jacket has metal buttons with metal shank on the other side, connected through small buttonhole. In this way, the buttons can be removed and installed back easily. I guess it will create much stronger buttons than the ones attached with thread. As you can see, the buttons on Sidra’s jacket are type A.
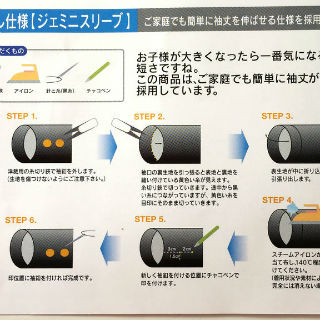
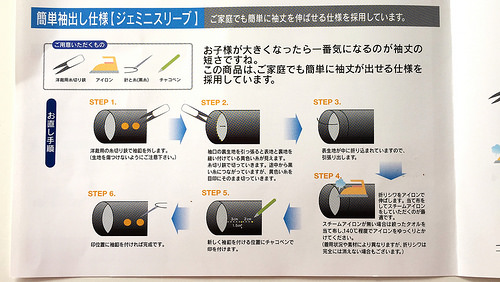 Lengthening the sleeves
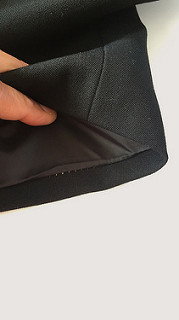 Tiny yellow stitches
The steps for lengthening the sleeves.
- Remove the buttons.
- Unpick the stitches connecting the lining to the sleeves hem, indicated by yellow thread.
- Once the yellow stitches are removed, the hem can be folded out.
- Press to remove the fold mark.
- Mark the buttons placement.
- Attach the buttons back.
I think the sleeves have two levels of hemmed edge. The first level is attached the ordinary way at the edge of the sleeves. Then moving up several cm, the hem and lining are stitched together again using the yellow thread to shorten the sleeves. To lengthen the sleeves, the yellow thread is removed. You can see the tiny yellow stitches in the picture.
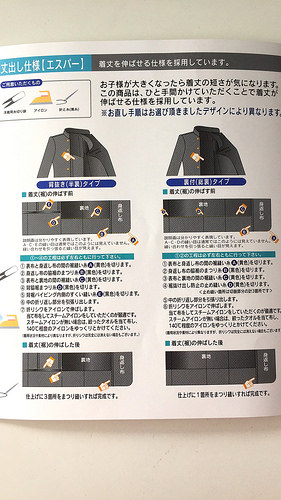
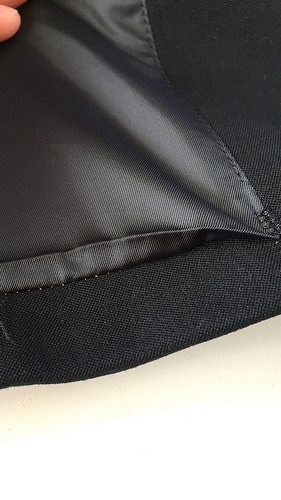
The manual shows two types of jacket, one with partial lining and the other with full lining. Sidra’s jacket has full lining. The jacket can be lengthened the same way as the sleeves, by removing the yellow stitches thread along the hem.
The little hands on the manual points the position of the stitches that need to be removed. To keep the hem from falling open, there are several yellow bartacks on the lower part of seamlines. The bartacks are removed as well when lengthening the jacket.
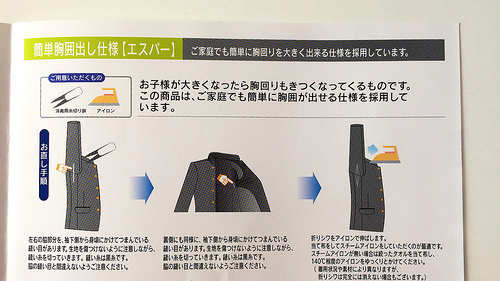 Enlarging the jacket
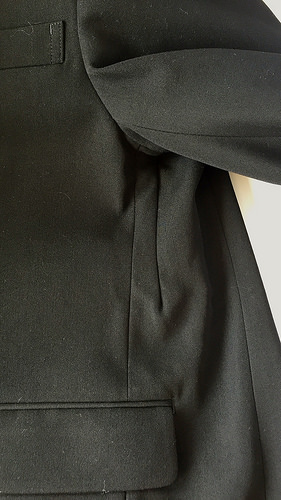

The jacket can be enlarged simply by opening the darts on the underarm of the jacket and the pleats on the lining.
 Enlarging the pants
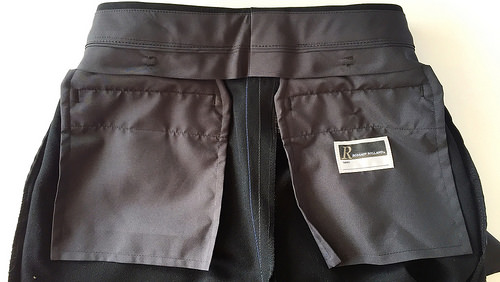
The center back of the pants has two seam lines, one in blue and the other in black. The pants can be enlarged by removing the blue stitches as indicated in the manual.
And here is some more details on the uniform, if you’re interested.
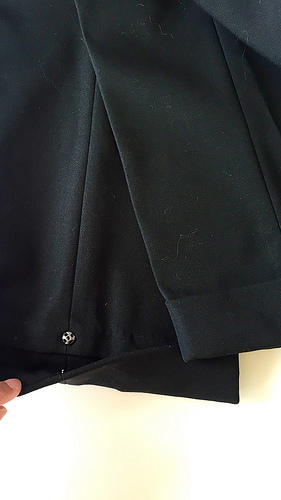
The pants has a name label attached on the lining of the back pocket. The cuffs have snap-on buttons so they can be lengthened as well. Sidra’s pants are actually too long but they have been altered by the store where we bought the uniform.
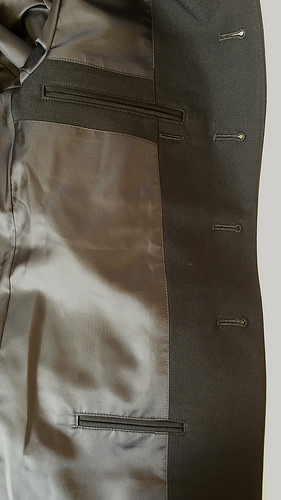
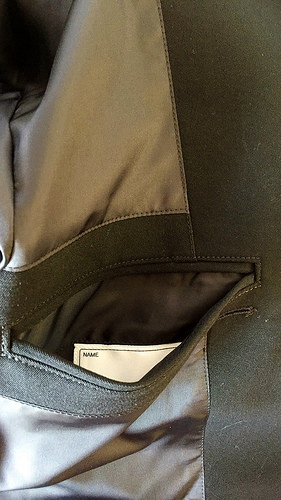
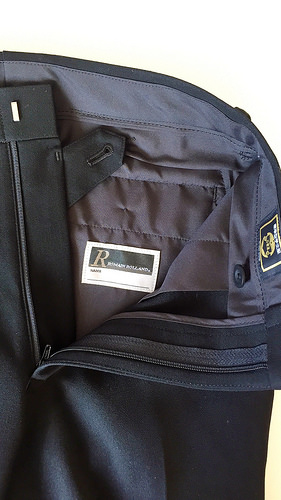
The inside part of the jacket. The name label is on the inside of the left side upper pocket. The pocket on other side of jacket has zipper.
For me, the most impressive thing is the fact that all these alterations can be done even by someone who has no experience in sewing. No sewing machine needed, and the only hand sewing required is for attaching the buttons on the sleeves – which most people can do.
The shoulders are still a tad too long for Sidra, but I guess altering jacket shoulders with pads is quite a difficult thing to do. The jacket and pants are made with washable wool with a bit of stretch in it so they are quite comfortable to wear.
Now that I don’t have to worry about the uniform becoming too small, I hope they can withstand all the activities that a junior high school boy will do for the whole three years!
28 Comments
where did you buy this?
I bought them at school supplies store appointed by the school.
This is really ingenious! We don’t have anything like this in Spain.
All children clothing should be like that. There is a lot of thought and engineering in this and I love it.
This is very clever! I purchased a snow suit for my toddler this winter from Columbia – a Canadian brand – and it has a similar feature in the sleeves and pant legs allowing them to be lengthened. Hopefully the idea catches on.
This is fabulous! I didn’t even know that this kind of thing existed, and now I think it’s awesome that it does! Thanks for showing us Sidra’s uniform! :)
Wow, that’s pretty amazing! I taught English in junior high school in Japan and never knew this little secret about the uniforms. If only every garment could be altered as you grow… thank you for sharing!
This is really cool, thanks for sharing! It is nice to know that not EVERY society is throw away, that some societies actually put thought and care into the life of a garment :)
How fantastic and ingenious! I like the style, too, it’s very smart. My mother would have loved a clever design like this – she had to buy many new uniforms over the seven years of secondary schooling we have here in the UK, and the blazers were often bought over-sized for me to ‘grow into’. :)
This is amazing, I think I’ll have to link on my blog. Can I ask if you have second hand uniforms in Japan? Is there such a thing? In Australia private school have very expensive woolen jackets, we almost always purchase those from the school uniform shop second hand. The shop will replace specific trims before reselling.
I don’t see many second hand uniform here, although I’ve seen a little number of them when my husband and I visited the school for the explanation meeting. They were not in stores, just a few on a hanging rack. But I’m sure that people can find some :)
That is genius! I shudder to think the expense of such a uniform so the ability to get multiple years of wear out of it is fantastic!
Wow! This is so cool!!!!!
That is brilliant! Gosh, you’d never find something like that here in the states. Thanks for sharing!
That is super cool! So much thoughtfulness in one garment
It occurs to me this might be a useful model to keep in mind when making something with fabric that shrinks over time… If it shrinks evenly, I suppose.
I agree that it can be applied when making something for ourselves!
Amazing! Thanks for posting this. I consume a lot of Japanese media – manga, anime, doramas – and especially like slice-of-life genre set in school. This is a fascinating insight into the uniform I’ve seen hundreds of times. Thanks for informing how I look at it in the future. I, too, wonder if the girls’ version is as versatile.
That is so cool! Thanks for posting this!
That’s quite interesting. In the interest of just understanding the culturally different aspects from the U.S., what is price range of such a required Japanese school uniform constructed with such detail?
I’ve written more about the price range in the next post. Thank you! :)
Interesting. That is amazing they have thought the uniform out in such a way. As you said even a non sewing person could do those alterations.
I’m in awe! RTW clothing other than men’s suits with seams & hems containing usable amounts of fabric for letting out!?!? That’s a Totally Inconceivable Concept in the U.S. Not to mention alteration instructions being included. Do girls’ uniforms have the same system?
It would be interesting to see a “true cost” comparison of these vs buying cheaper items every time the little darlings grow a bit.
Thank you for your interest! I’ve written more about the cost about the uniform in the next post :)
This was fascinating! So much nicer than the horrid polyester doubleknit uniforms we had. Is the wool truly washable? In my sad experience, “washable” woven wool starts looking terrible after about the second wash. I don’t know why, when washable wool knits are usually fine. How often would you expect to wash these items? And does he have multiple sets?
Actually I have no idea if they’re truly washable. I think I will wash the pants at home and bring the jacket to the dry cleaning service. My son only have one set -because pricey :( – maybe we will get him another pair of pants. In summer he doesn’t wear the jacket, only white shirt and pants.
that is amazing! what a great system!
Wow this surely is genius!