drupal hit counter

Mini wallet tutorial

Mini wallet tutorial
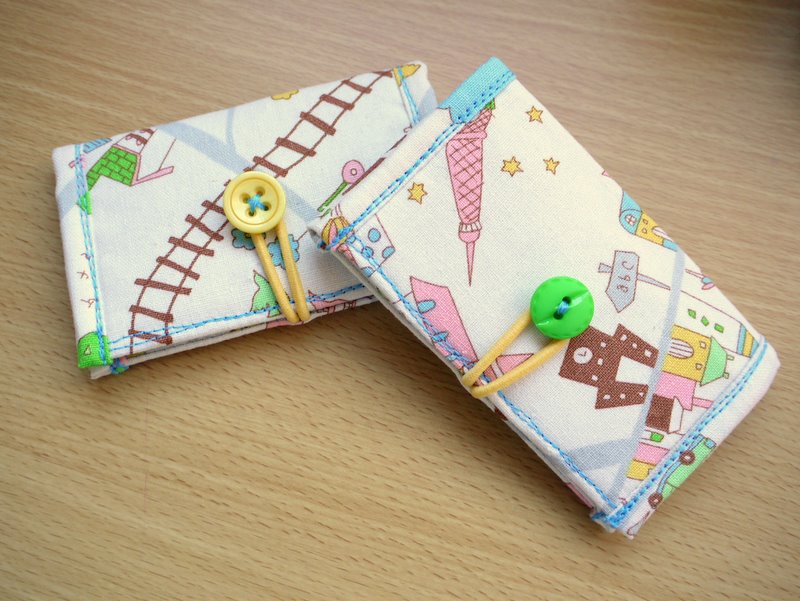
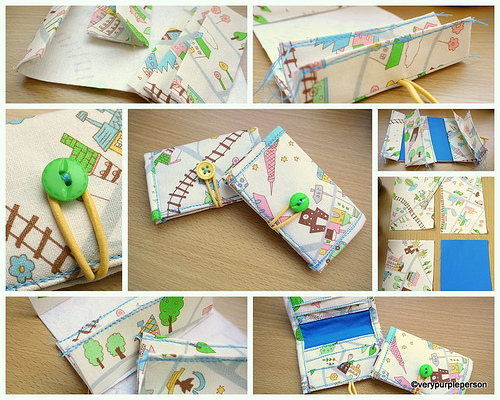
Yay I finished it! This is the tutorial for the mini wallet in this post. For the tutorial, I made a pair of mini wallets in Japanese cotton with colorful houses pattern on it. I really enjoyed making them and the tutorial.

The tutorial for the bigger wallets is still in progress, and it will be posted soon when it’s ready!

As it would be too long as a blog post, the tutorial is made it into a pdf file that can be downloaded here. Please contact me if you have any difficulty downloading it. This is also my first time making a pdf tutorial, so do tell me if anything is not clear.

I hope you enjoy this tutorial and make your own mini wallet. This little project is perfect to finish up those fabric scraps in your stash. Combine different colours and patterns together. You can also opt out the elastic and button and change it to snap-on button, velcro strips, or magnetic closure. When you finished, you can add your wallet to my flickr gallery here.

Disclaimer: You may use the finished products for both personal and commercial use (craft shops or markets only – no mass production). Please do not pass off the pattern and tutorial as your own. Thank you!

Click to download:
Mini wallet tutorial (23518)

Have you made something from my tutorials? Join my flickr group to share!

Featured in:

50 Responses to Mini wallet tutorial

  1. Mirabell says:

    Just found your lovely tutorial via Guthrie&Ghani blog and indirectly via the Great British Sewing Bee.It’s quite amazing how things work, isn’t it? Thank you very much for sharing this.
    Stefanie

  2. Kathy Rude says:

    Very cute pattern, but you never mention how to put the lining in.

  3. [...] add mod podge,  and also…attach a card holder. Which I forgot to take photos of… so here is a link to a tutorial–sorry :S. It is optional, and I decided to do it because I got bored waiting for drying [...]

  4. omie says:

    thanks for the tutorial!love it!

  5. Lia says:

    Thanks Novita :)
    Seneng rasanya waktu nemu tutorial ini, soalnya aku pengen banget bikin mini wallet :) .

  6. Lia says:

    Thanks Novita:)
    Seneng bgt waktu nemu tutorial bikin mini wallet soalnya saya pengen bgt bikin ini :) .

  7. Jack Vaz says:

    Perfect!!! Thank you for tutorial… you are so lovely and creative. congratulations…

  8. Em says:

    Finally a wallet-tutorial I can use! Thank you so much!

  9. [...] Wallet Tutorial Mini-wallet for cards from the Japanese cotton fabric. [...]

  10. Briana says:

    Oh I’m so sorry! I just looked at it again and realized what I though were sixes were actually fours. Thank you for your help and sharing of your wonderful skills.

  11. Briana says:

    Thanks for the tutorial! I am confused about the B1 and B2 pieces though. B2′s whole measure is 21.5 but the parts add up to 23.5. B1′s whole measure is 15.5 but the parts add up to 17.5. Which are correct?

    • verypurpleperson says:

      Hi Briana! Are you sure the add up to 23.5? I just checked it again and it is still 21.5. Maybe I don’t understand which parts that you mean?

  12. [...] Mini Wallet Tutorial: Button & elastic closure, finished size when folded: 11×7 cm; finished size when opened: 11×14 cm; 6 card pockets. Free pattern available via pdf download. [...]

  13. Singoalla says:

    Hi , I´ve cut all my pieces, but I can´t find the description HOW to make it. Or do you have to be very clever and figure it out your self. I tried but without success….
    I really what to try and make this wallet.

    Thank you!

    • verypurpleperson says:

      Hi, I don’t know what you’re talking about being very clever.
      It seems that you only got the first page of the file. The PDF file is 3 pages, step by step instructions with diagrams and pictures are in page 2 and 3.

  14. Christine says:

    Thank you very much for so generously sharing! :)

  15. catarinanl says:

    Than you so much for this tutorial. I made my own version of this mini wallet. So simples and easy.
    Thanks a million.

    Catarina

  16. DPM says:

    thanks for the great tutorial. really good gift idea!

  17. krista says:

    i love this! i just finished making mine, and am posting pics of it on my blog, with a link to your blog of course. :)

    i hope that is o.k. with you. if not lemme know, and i will remove the link. :)

  18. Anonymous says:

    Thank you. :)

  19. verypurpleperson says:

    Hi Omelay, thank you very much for pointing this out! Please refer to the diagram for the right measurement.
    I made a mistake there, I'm so sorry! m(_ _)m

  20. omelay says:

    Hi! I am making these right now for the first time. Am I missing something, or does the initial Prep tell me piece B1 is 20 x 11 cm and the illustration describe it as 15.5 x 11 cm?

  21. missbmckay says:

    this is really fun and functional. great design.

  22. Kim says:

    sweet! Looks like a fun project I'll have to try!

  23. Aimee says:

    Really cute! Thanks for sharing – I know it's a lot of work!

  24. Salihan says:

    The tutorial is GREAT! Such clear instructions and so many diagrams. Absolutely fantastic! -me@salihan.com

  25. Katie says:

    Wow! This is fantastic! Thank you for sharing!

  26. apartyof5 says:

    Wow – thank you for the tutorial, it is fabulous, am making a wallet now. Found you via sew mama sew and now have you on my blog reader :)

  27. The Bothered Owl says:

    A lovely tutorial, thank you so much! I will definitely be trying this one out :->

  28. verypurpleperson says:

    Thank you, everyone! I hope the the tutorial is clear!

    Sew Much Ado, I use a vector program (CorelDraw) to draw the illustrations ^.^

  29. Sew Much Ado says:

    That is so adorable! I love it. Can I ask you what program you used to do your illustrations? They are great.

  30. Serena says:

    Thank you for this wonderful tutorial!

  31. Rachel@oneprettything.com says:

    That is DARLING! I can't wait to make one myself. Thanks so much for sharing your tutorial, I'll be linking to this.

  32. tyska says:

    Great job!
    I'm looking forward to see a tutorial for the bigger wallet:)

  33. Eva Marie Sutter says:

    So great! My old wallet is bursting with too much ephemera. This tutorial is just in time and so well done. Your creativity is infectious and inspiring.

  34. Ida Nielsen says:

    Ohh, thank you so much!! You should enter this wallet in the 'Scrapbuster month' competition at sewmamasew.com.

  35. Anonymous says:

    Thank you – I admired your wallets the 1st time you made them.

  36. Con pájaros en mi cabeza says:

    yujuuuuuuuuuu!!!! thanks…

  37. inoriz says:

    Yay! Thank you very much!

  38. Jessie Fincham says:

    thanks so much for taking the time to write the tutorial :) it looks fantastic! can't wait to try it! :)

  39. Khathle says:

    Thank you so much, for this tutorial and this blog.
    Every week, I'm looking forward to reading your new post.

  40. Karencilla says:

    THank you!! this is great.. now i need time! :/

  41. lunatepetal says:

    A W E S O M E !

  42. Cristina says:

    THANK YOU
    I know it is very hard to do a tutorial, a lot of work there, for that i say thank you for your work, and thank you for sharing this wonderful mini wallet :)
    Cristina

  43. Katie says:

    Congrats on your first tutorial! Looks great, thanks!

Thank you for leaving a comment!