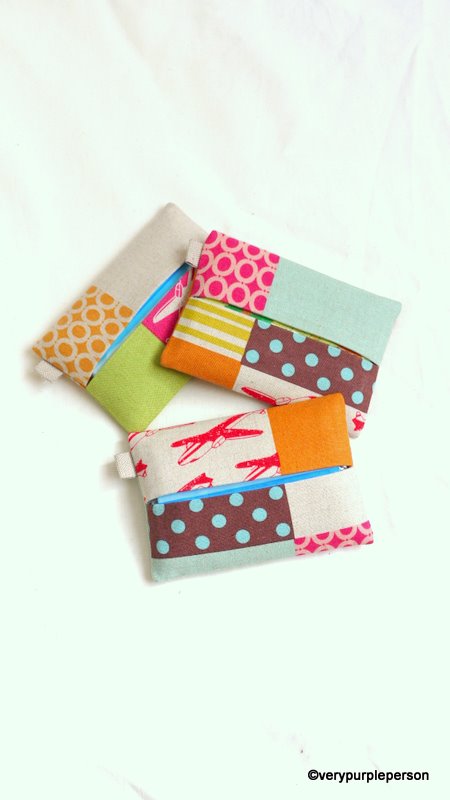
I’ve used my new sewing machine to make these very simple tissue cases from scrap of linen fabrics. They are basically a lined fabric rectangle folded to meet at the center. I make the outer fabric longer than the lining fabric so it automatically folded inside, because I don’t like the lining fabric showing at the edge. It also eliminates the need of topstitching.
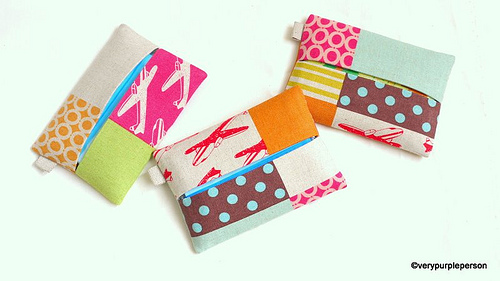
The tutorial is only two pages, but please tell me if something is not clear in it.


Disclaimer: You may use the finished products for both personal and commercial use (craft shops or markets only – no mass production). Please do not pass off the pattern and tutorial as your own. Thank you!
Click to download:
Tissue case tutorial (15315)
Have you made something from my tutorials? Join my flickr group to share!


Those are adorable! Thank you!
two pages of the Tissue case tutorial is not clear
Can you tell me which part of the tutorial that is not clear for you?
[...] presents for all your colleagues. And while you’re at it: here’s a tutorial for the tissue cases. Share this:PrintFacebookPinterestTumblrLinkedInStumbleUponTwitterLike this:LikeBe the first to [...]
I used your tutorial to make a present for a friend. It turned out beautifully and I even had to do conversions to inches. I shared your tutorial today here: http://crazydazedesigns.blogspot.com/2012/05/package-pals-craft-exchange.html
[...] lovely tutorial to share: tissue holders by Very Purple Person. Super easy. Super quick. Great way to get rid of scrap fabric. Since I can’t seem to find [...]
Thanks so much for this tutorial – these are so cute! I’m going to make some for my sisters as stocking fillers.
[...] It’s way too early in the day, and the sun’s shining spectacularly. When I came across this tutorial, I realized that really, I’d like to keep tissues in my bag, and the only reason I [...]
Hi! I used your tutorial and just had so much fun sewing these. I made some changes for me to use scraps of fabric, but the basic pattern started with yours. Thank you so much!!
Here’s a link to my post where I blogged about it.
http://www.jillruth.com/2011/10/tissue-covers-from-vintage-fabric.html
Hi there,
since you are my tissue-case-hero I linked you from my (very little) blog.
Greetings and thanks for sharing.
Kirsten
[...] moving on (^.^) I downloaded verypurpleperson’s tissue case tutorial a few months but had never got round to using it. Today, however, I fancied a quick project with [...]
Hello,
I love your tutorials! Please let me know when you make a pink one. I’d love if you could have a guest post on my blog! Let me know
Thanks for the tutorial. I just made this for my one-thing-a-day challenge (http://sewidiotic.blogspot.com/2010/08/day-17.html) and I’m likely to be making some of your other patterns soon.
[...] seguendo questo tutorial/Made following this [...]
[...] seguendo questo tutorial/Made following this [...]
[...] seguendo questo tutorial/Made following this [...]
[...] seguendo questo tutorial/ Made followwing this [...]
[...] seguendo questo tutorial/Made following this [...]
[...] following questo tutorial/Made following this [...]
[...] Realizzata seguendo questo tutorial. [...]
Hi,
I came across your blog through Burdastyle.com. I love that fabric you used for the tissue cover! Could you please tell me the name/manufacturer of the fabric?
Thank you!
Oh I just answered in Burdastyle!
It’s Echino by Etsuko Furuya.
This is such a great tutorial, I loved making these and it’s soo easy. I will be posting them on my blog here soon so please feel welcome to come and drop by…
http://intellectt.blogspot.com/
[...] kids can make 22. Handlebar flower. 23. Seed tape. 24. Fabric tissue case (found via OnePrettyThing). 25. Friendly felt-embellished paper clips. 26. Sunprint pencil cup. [...]
[...] finally i finished one of my little projects, a tissue case. again, by following verypurpleperson tutorial ^^. and there are still 3 pieces to [...]
[...] kids can make 22. Handlebar flower. 23. Seed tape. 24. A fabric tissue case (found via OnePrettyThing). 25. Friendly felt-embellished paper clips. 26. Sunprint pencil cup. [...]
[...] you can just wing it, but there also are several tutorials around the web. My favourite would be this one (read that blog if you like to sew, it’s [...]
Great tutorial! Thanks for sharing it, I find cutting the outer fabric longer than the inner very useful, not only for this project but for many others. Great tip for a beginner
Thank you so much for the tip! ^^
Thanks so much for the tutorial! I made a couple of these and posted them on my blog with a link back to you. Thanks again! http://www.marthashmartha.blogspot.com
Hello, Purple Person! I just found you today and I’m very charmed by your site! Thanks for posting your tutorials – perhaps they will be the thing to finally force me to figure out how to use the old sewing machine I was given months ago…
Love it!Such a nice little sewing project
[...] combination of tutorials I’ve been collecting lately. One is from here and the other from here. I changed the size and methods but both are really good to get you started. The fabric for the [...]
Thank you for all your lovely posts, especially loved this one!
This is so very gorgeous. Well done, you! Will be making one asap!!
.-= Skebba´s last blog ..<a href=\ =-.
Thanks for sharing! Very nice and functional!
Thank you for this tissue case tutorial, I made one.. soo easy
Love it.
It gave me confidence to try your other tutorials
I love this tutorial! Thanks so much for putting it up, it makes it so easy for a beginner like me to make things.
.-= Kirri´s last blog ..<a href=\ =-.
Thank you for the tutorial, it sure help me with my online bags business, i’ll sure name it after you…Congratulation on your new sewing machine!!
Nomaliza
.-= Nomaliza´s last blog ..<a href=\ =-.
Hi Novita,
Thank you so much for sharing the tutorial! I love the fabrics you’ve used for yours.
Also, congratulations on your new sewing machine!
Cheers from Toronto
.-= Maria´s last blog ..<a href=\ =-.
That is super cute! Thanks so much for sharing, I’ll be linking.
I love it! your tutorials rock!
Congratulations for your brand new sewing machine and thank you for the lovely tutorial, it’s so beautifully done! You are very talented and we can’t wait for more creations to come, have fun with your new sewing friend!