drupal hit counter

Wallet tutorial

Wallet tutorial
Here’s the tutorial for these wallets!

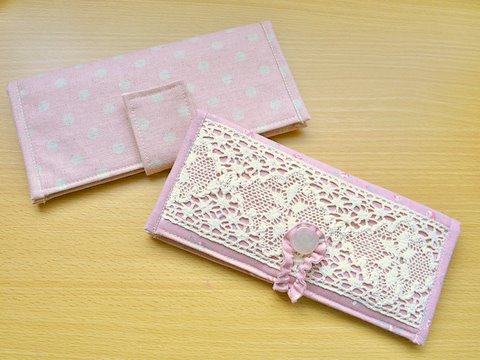
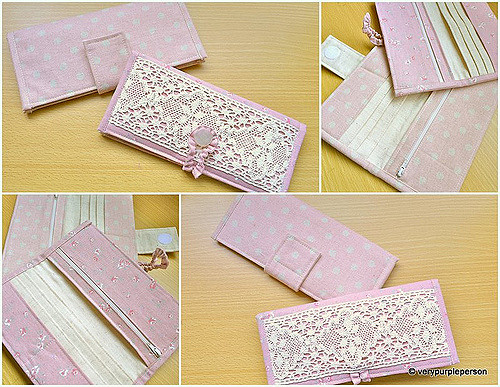
The tutorial includes two variation of the closure, one with tab and velcro and the other with fabric loop and button.

For the tutorial, I made a pair of wallets from pink Japanese cotton fabrics, one in polkadot and the other one in floral pattern. The beige linings are Indian cotton fabrics. I hope the colours of the fabrics are not too muted in the pictures.

The tutorial can be downloaded here, it’s a 7 pages of PDF file. Please contact me if you have any difficulty downloading it, or if anything is not clear.

I hope you enjoy this tutorial and make your own version. Instead of velcro or fabric loop, you can also use snap-on button, magnetic closure, or plain elastics without the fabric loop.

Disclaimer: You may use the finished products for both personal and commercial use (craft shops or markets only – no mass production). Please do not pass off the pattern and tutorial as your own. Thank you!

Click to download:
Wallet tutorial (57453)

Have you made something from my tutorials? Join my flickr group to share!

71 Responses to Wallet tutorial

  1. [...] is my second attempt at a wallet, my first did not turn out so well, and I got the pattern from Very Purple Person. I made a few adjustments and combined a few of the steps though. I also forgot to use a piece with [...]

  2. Lehua says:

    Thank you for the tutorial!!
    I just made a wallet for my daughter. She liked it alot and I was very happy to see her smiling. :)

  3. Hi, I just made a wallet from your tutorial the other day, but now the link is broken. Could you fix it? I would love to make more wallets for my girlfriends… =) Thanks a lot!

  4. Bridgette says:

    Thanks so much for posting these tutorials. They are easy to understand and have great pictures!

  5. lina says:

    hi, your blog is very interesting .. Your name as the name of Indonesia,,, Greetings from Indonesia _LINA

  6. Sam says:

    Thank you! I am now the proud owner of a much needed new wallet. The tutorial was really easy to follow. I have posted about it here http://elephantandwalrus.blogspot.co.uk/2012/08/the-replacement.html

  7. mel says:

    Hi. This tutorial is amazing – it has very clear pictures and instructions. I have linked you on my blog: http://mel-allwrappedup.blogspot.com.au/p/link-love-to-amazing-free-craft.html.

    mel@allwrappedup

  8. [...] at A Fashionable Stitch turned me on to the blog  verypurpleperson.  I love Sunni.  She is an ahh-mazing seamstress.  She is my idol.  I want to sew like her.  [...]

  9. [...] Verypurpleperson.com Yang ini modelnya juga hampir sama dengan hasil tutorial sebelumnya cuman cara kasih penutup dompetnya berbeda [...]

  10. Haruhi says:

    Hi there! :D
    Thank you really much for the free tutorials!
    They are awesome!!! \(^o^)/
    I wish you to continue to be this creative and skillful this year as well!
    Best wishes and Happy New Year! (^_^)

  11. Elnora says:

    Thanks for the great tutorial! I’m pinning it on Pinterest.

  12. Duari says:

    Thank you so much for the tutorial!!! I was searching online for a wallet pattern and just didn’t like any of them (most didn’t include a zipper section for change) or were just too small. Your directions were very clear and easy to follow. The only problem I had was converting the cm to inches! This was very challenging. I used online converter but it would only convert to tenths of an inch and I wasn’t sure how to translate that into 1/8th of an inch??? So I just guestimated! I had a bit of difficulty with the binding as well (I had never used this to finish an edge…but will from now on!) but just read the post below where you suggest sewing one side then useing fusable tape to hold the other side to topstich. Will use this method next time. Thanks so much. I hope one day to have your skill level!

Thank you for leaving a comment!